Sully the LDV Convoy

'Twas the season to be..... Knocking the van about

After 12 months with the van we decided to tinker some more. Having used the van a fair bit we'd got some idea what worked for us and what didn't so much.

The bed has always been a bit narrow and a bit of an assembly job. So I thought to make it bigger n simpler to change from sofa to bed n back. Then I thought of a thing or 2 more .... Then I started over Xmas and opened a whole can of worms.
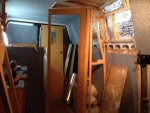
image.jpg

So far I've

Removed the old bench/bed assembly
Removed the small cupboard next to the bench (to provide the extra width for a wider new sofa/bed)
Junked the old kitchen work tops
Pulled the old faux laminate floor tiles
Removed the cloakroom partition wall
Removed the rear cloakroom wall between the c-room & rear storage area
Replaced the rear wall further back
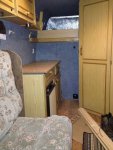
Replaced the partition wall & CR door further back (making more living area space)
Boxed in the rear wheel arch so it can accommodate the loo (cos the wheel arch is now all in the CR floor space)
Laid some thin floor insulation and put down laminate wood floor

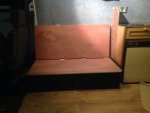
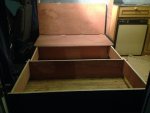
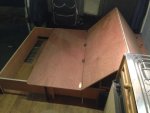
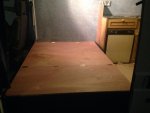
Built a new bed. Base telescopes out in 2 sections across the van then to board it out I made the boards hinged so that the seat base pulls out to the foot of the bed, and draws 2 upright (sofa back) sections
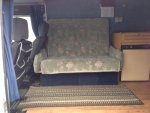
image.jpg

Relocated the leisure battery from under the sofa to the rear storage area and extended the electrics

Ditto the night heater. To recirculate the living space air I made a chamber so air enters the unit from the wall and draws air from the under-sink cupboard then it's blown back into the living space

Moved the gas bottle to the storage and extended the gas line via a tap so I can isolate the gas inside the van

Installed a Computronics 5A intelligent mains charger in the storage area

Stripped and serviced the night heater

Still have to build a new cupboard in the van, fit new work tops, replace some electrics and led lighting and make the foam up to fit the new bed width and get it upholstered, and freshen the cupboards up with a coat of paint.

And that's just the inside! There was me thinking "it's just a few little jobs over Xmas"! I'll still be at it at Easter at this rate!
 
Finished putting the last bit of wall back up today and reinstated the dc wiring for the rear storage and the cloakroom, and added a new bit in the living area.

The 2 upper wall sections between the cabin space and cloakroom and the storage have been of heavy ply. This might seem ott and hefty but I want to hang my mountain bike and other items off the walls with brackets so beefed them up.

The rear storage and cloakroom lights are now LED with PiR on. So although I have switches in circuit I can leave them on and they'll switch off anyway. These were in Lidl as AAA battery operated but I've connected them up to the leisure batt of course. They work great - no need to fumble about for a lightswitch and no worries about leaving them on by accident.

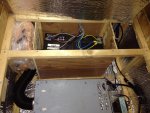
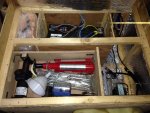
Also I have made a tool tray that sits on top of the webasto heater which is in a boxed chamber in the storage. This now carries the bottle jack and a few tools tucked away.

Also have used the silver screen bubble wrap / foil sandwich stuff to insulate the heater chamber all round and the lid and also all walls between the storage and the habitat area.

My leisure batt is also in the same box / chamber as the Webasto but is segregated in its own section. The mains batt charger is in there too ( not with the battery of course).

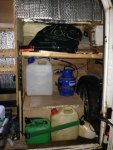
On top of the boxed heater etc. is where the gas bottle and fresh water tank lives along with a storage box. In front of the box right behind the rear doors I have just enough space for the webasto fuel tank, the grey waste can (transit only cos it goes outside the van in use) and a spare can of kerosene for the heater.

It's all a lot neater now and has marshalled all services into the storage / utility area of the van, collected in one space. Also it's released all the space under the sofa / bed for internal storage and of course made it easier to get at everything now it's at the back doors not scattered about in the habitat spaces (where they shouldn't have been in the first place).

Still quite a few bits to do - but it's getting there!

Oh yes - the new bit of wiring in the living space is for an LED strip light on the ceiling. Lights up the space well and is thin with mtg clips that fix it snugly to the ceiling out of the way (the LED is a 3-section item that can be daisy-chained with wire extensions or just plug together in one section like I've done. It came with a mains adapter & was also picked up in Lidls - think it was £11).
 
Last edited:
Keep at it, every little bit is a bit nearer the finishing point! I am thinking about having a multi led lamp mounted in the centre of the van roof to supplement the 2 old wall mounted caravan gas lamps Im converting to led's. I got a couple of 3 led aaa battery powered push on off lamps from the pound shop for the alcoves here and there.Dont reckon much light is needed as only using van to sleep, eat and travel in around France etc in the summer.Also going to convert a couple of old oil lamps to led to hang outside in the eves if we sit outside.
 
Ive just read right through your thread and enjoyed it Well Done on all you've done Regards Jo
 
ooh - LED oil n gas lamps!

wall mounted caravan gas lamps Im converting to led's.

Also going to convert a couple of old oil lamps to led to hang outside in the eves if we sit outside.

I like the sound of your converted gas and oil lamps. Efficient with a bit of character! Would like to see pics to see how they turn out!.

I doubt I'll get to spend summer in France unfortunately - it'd take a sudden cash injection so I didn't have to go to work first! Sounds great though. So I'll be needing the lights a bit more than you will Rodeo! LED's are great though - better light and vast power cons reduction means no worries about actually using them & not flattening the battery. I've spent altogether maybe £70 on LED light units and bulbs - it's added up bit-by-bit & the costs snuck up on me! I reckon it's worth it though.
 
why not keep one gas light and connect it? they give a lovely light,with a soporific hiss and warm the van up-and no battery needed
 
why not keep one gas light and connect it? they give a lovely light,with a soporific hiss and warm the van up-and no battery needed

If it was me that had the old Gas Lamp I'd be tempted to do just that NB! I haven't seen one if the old caravan gas lights though since I was a kid in a then-old static van. I reckon if it was only used when in the van and awake a gas lamp would be ideal!

Can you still get the wicks or mantles for them then?
 
Yes I reckon theyre still available.The hissing sound could be reproduced by one of those model sound generators! Unfortunately, I've had these lamps for many years and they have small parts missing, so hence Im converting them. The brackets and globes are fine though.I chopped them around and am going to open up the gas supply tube to run wiring inside, then use one or 2 leds in each.As long as they 'look' right then they should be quite cool looking.
 
Last edited:
My new bed frame / base

My (fairly iffy) skills have managed to cobble together a new bed frame and base layout assembly

image.jpgimage.jpgimage.jpgimage.jpg

Wider and easier to put out and away as the base pulls out so Section 1 pulls out section 2 from the seat base. Then the boards fold out across the frame with the seat base ending up at the foot of the bed.

I wish my ability was better as I took ages and it works ok I'm sure those with better skills would have made a neater job.

It'll do though and seems nice n strong. The lower section cross members line up under the edges of each board section where the hinges are to keep the thing rigid.

Old bed was a faff to assemble and was a bit too narrow. This one should be much better.
 
My (fairly iffy) skills have managed to cobble together a new bed frame and base layout assembly

View attachment 20052View attachment 20053View attachment 20054View attachment 20055

Wider and easier to put out and away as the base pulls out so Section 1 pulls out section 2 from the seat base. Then the boards fold out across the frame with the seat base ending up at the foot of the bed.

I wish my ability was better as I took ages and it works ok I'm sure those with better skills would have made a neater job.

It'll do though and seems nice n strong. The lower section cross members line up under the edges of each board section where the hinges are to keep the thing rigid.

Old bed was a faff to assemble and was a bit too narrow. This one should be much better.

great work here
 
nicely done mate ! a plywood rock'n'roll bed ! looks good
gas lights can still be bought,mantles are still available,camping gaz mantles can be adapted and new glass shades easily made from jamjars
 
Do I need an AC main light at all?

nicely done mate ! a plywood rock'n'roll bed ! looks good
gas lights can still be bought,mantles are still available,camping gaz mantles can be adapted and new glass shades easily made from jamjars

Well I don't own a welder ( can't use one properly either!)! Gave it some thought and figured I could get away with plywood instead of a steel space frame.

Needed to buy one sheet of 3/4" for the base and one sheet of 1/2" for boarding out. Bed is 4' wide which kept it simple. Simple is good if you've as little practical experience of this stuff as I have haha!

I quite fancy the idea of a Gas Light! Not sure where I would site one though. Also with LED strip light as main jab light and G4 LED bulbs in the cabinet downlighting, also loo and rear storage with PiR operated LeDs ( also put LED lamps into the courtesy lights too) - I'm not sure if I need one cos my lights shouldn't hammer a 100AH battery.

Am thinking to remove the fugly AC light unit in the Hab. The LED gives plenty of light and I have a mains charger in circuit so if on hookup the battery draw is being replenished anyway. So I can't see that I need an AC light - should I keep one as a back up ( not that we are on hook up usually anyway Cept outside the house)?
 
What was a concern was the drawing out of the bed frame scratching up the new laminate flooring. So I wanted to put something on the underside/feet of the base sections. But what?

First idea was Felt. Then Lisa's sister had a good idea - cheapo carpet floor tiles! (£0.99 for 4). Cut into strips and wood glued onto the frame they help the sections slide and protect the floor.

The frames only been pulled in and out a few times but so far the carpet tile on the runners has done a grand job.
 
I don't have an ac light as I never go on hookup .I always have a good central light which is great for when you've lost something,like your last blim or a contact lens etc,but all other lighting is muted
 
Good bed idea.Bet it took a bit of working out!

Cor - you're not kidding! Too much to think about all at once so that one 'fix' didn't cause another part to not work/fit!

Seat base had to be correct depth so that extensions could fit tight up to it, and also mean the extensions were also deep enough to cross the floor.

The boards had to be a size where they would lie on the base without any traps creating weak unsupported areas - so the hinges/board edges needed to be able to line up so they lay across the frame cross-members when extended (I didn't want to have to have loose parts like bracing to add/build in every time the bed was made up). I was pretty close from the off (plus of course the frame can be moved slightly to make sure it lines up as its independent of the boards), but I did screw 2 small wood blocks on to adjust/limit where one of the stages extended as a 'tweak'.

The boards also have suitable dimensions to carry the cushions in seat and bed modes, and for the cushions to fit snugly across the van (so they won't shift as a mattress). Haven't sorted the cushions properly yet (I have the dimensions I need, and I think I have enough foam but will have to mess about a bit), but basically the seat back/base will form the top 2 mattress sections, and the last section will be a 2-part affair with a cloth 'hinge' (so it's rigid when laid flat, but can be folded in half longitudinally for stowing in a space allocated for it in transit / seat mode).

I also made it so that the centre board (the 'face' of the seat back when folded) is slightly longer than the other upright (folded) board its hinged against. This was so that when in seat mode it'd 'push' the assembly back against the van wall and lock it there, rather than it wanting to fall forward, and this also keeps the seat back with a natural slight recline angle for seating comfort as well.

It needed to be made from the 2 Ply sheets without wastage (or messing up!) so I also had to consider cutting and minimising wastage from the pair of 8' x 4' plywood sheets

What a palaver! I'm not used to doing stuff like this, and it was like juggling soot (or herding cats) for my poor non-DIY brain!

I did a LOT of sketches and measurements (amended many times) and double-triple checked before I got the T-Square and Saw out and started cutting my precious Ply up!


The cushions I have as they are will deck the bed out nicely - so it has been tested - Lisa's teenage daughter and her schoolfriend overnighted in it (parked in the drive - they think its fun!) and pronounced it very comfortable. But they don't fit the seat so I have to make up new stuff and then get it covered (a task I shall stay well away from!)
 
Worth the effort though! I know what you mean about cutting the expensive ply! I ended up only having to buy one sheet, cos I had all the rest in stock, but it broke my heart to have to pay for it!
 
Rear Storage - Services Area, Gas, Water, Heater, Battery & Charger Location

As part of the revamp I decided I wanted to relocate all the services and marshall them together, accessed from the rear doors - making a combined storage/service area. I wanted the habitat area free of all this stuff so that cupboard space in there is maximised for clothes, bedding etc.

So the rear has the lower RH side as a service area, while the left is full height so I can stow my Mtn Bike and or windbreaks, lawn chairs or whatever (plus the bottom 2/3 of the wall between the storage and the cloakroom in front of it opens and folds back to give a throughput for longer items - I should be even able to put a kayak inside the van with the loo cloakroom door opened as well if I fancy it).

So, the cable was extended from under the sofa so the leisure battery could be moved, and also I uprooted the webasto night heater. The heater is meant to recycle warmed air in the habitat for efficiency and I wanted to retain that, but with the heater outside the hab space! So I thought I'd build a boxed chamber where it can draw air from the hab, and then run it through the insulated chamber through the heater and blow it back into the living area.

I had to site the heater further to the rear of the van than I originally envisaged, cos the fuel tank and cross-members got in the way. So I moved the battery into the gap, then built the chamber so the heater works around the battery box.

Webasto Heater with tool tray removed.jpg Inside Rear Services Box.jpg

The heater draws air from under the sink cupboard and along the open cable space behind the units, runs it through the heater and blows it back into the living space through the wall into the Galley area.

New Webasto control & outlet location.jpg

I also sited the Computronics Mains Battery Charger in the inlet chamber space as it wouldn't get in the way and tucks it away neatly.

Above the night heater I made a drop-in tool tray (I made the box a bit taller than the appliances inside needed as there was only a narrow air inlet space to clear the spare wheel - so I wanted to make sure there was enough inlet air vent area -hence the height. So the tool tray is just making sure I don't waste the space!).

The whole box is insulated with the silver screen foil/bubblewrap sandwich stuff so that living space air loses as little heat as possible on the journey through the heater.

On the lid of the heater/battery chamber lives the Gas bottle (extended from under the sink unit with straight pipe and an isolator tap in the kitchen cupboard (so I can leave the gas bottle ON, but still cut the gas supply to the appliances inside the living space without having to go round the back), and the Fresh Water Container.

photo 1.jpg

The night heater works great in there, and there's less transmitted noise from it cos its a bit further away and behind the partition wall, and the dosing pump is on an extra rubber mounting right under the back bumper (well almost). The battery is segregated from the heater and the charger and is vented into the storage area to prevent and hydrogen gas build up when its being charged. The lid of the whole box is insulated so gives a good seal between the 2 chambers so it should be pretty safe.

Not sure if you're supposed to do it like this.... but it seemed a better idea than having the Gas Bottle, Night Heater and the Leisure Battery inside the living space where they were originally
 
Last edited:
What Lies Beneath!

Its just coming up for 2 years since 'Sully' was purchased.

After a bit of a revamp earlier in the year, and treated to some new cushions to suit the new SofaBed and a lick of paint inside, Sully has been used and enjoyed. The old bus is now firmly established, I've become irrationally fond of it, and would not want to be without my van now.

Ever since I got the van, I've thought... hmm LDV from 2000, the rust has to be kept at bay - must do something.

Well now - I have (well, not ME, but its been done).

My future Son-in-Law (who is a Lecturer on Mechanics and a handy welder-fabricator to boot, having worked restoring & maintaining classic rally cars) & my daughter gave me the present of waxoyling the underneath (with any welding etc. that might be found) for my Birthday back in May. As I've used Sully all summer, I only handed the van over a week or so ago for the treatment.

And... not only did Sully get treated to all of the above, but he threw in a service, welded the exhaust, sorted a slight play in a steering joint and greased the Kingpins, and removed the rear bumper, treated some tin weevil in the valance with some welding, and then Shultzed it all then put it back together as well!

I get Sully back tomorrow night, all spruced up and ready for the upcoming MoT - fantastic! I'm looking forward to getting the van back with no worries about what horrors lurk underneath - cos now I know there aren't any!

The good news is, that Son-in-Law reckons that overall Sully is sound underneath and generally in good order, and has a good few years left in the chassis - so I'm chuffed.

I know an LDV home-build isn't going to be viewed as much of anything to speak about for most, but for me Sully has the admirable qualities of being simple, robust, cheap, economical enough, large enough for comfort, while small enough for tackling the smallest country lane and supermarket parking space, while the layout works well for us too - I've even got a stowage space for my Mountain Bike and Gear behind the rear doors away from the living space.
I can't see anything else doing the job anything like as well for 2 or 3 times the money.

I hope to be trundling around in Sully the LDV Convoy for some while to come.
 
Like what youve done.

Like your way of thinking.And like what you have done to your LDV.We recently bought a 1991 mercedes home converted campervan reasonably cheaply,and at present are at the stage you were two years ago.Sorting interior tweaks to suit us,and gonna sort some rust under bonnet and underneath.Also the front carpet foam backed was wet so like yours ive taken it up and need to find where the water is coming in.I think maybe windscreen leaks.but not sure.Its fun sorting a vehicle which can give you the same pleasure as one costing many pounds more.:D


regards Michael
 

Users who viewed this discussion (Total:0)

Back
Top