Switch on contril.panel.

Nunny

Full Member
Posts
32
Likes
7
Hi .can anybody on here notify me as to what this switch does on my control.panel.above the hob on my 1994 hymer b534 .its the one in the middle next to battery indicatirs and the extractor fan all the others are labeled.
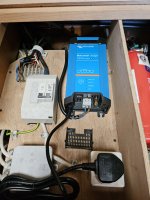
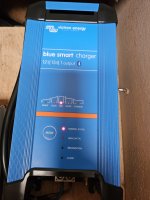
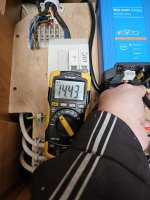
I seem to have a problem.with my on Board charger not charging the leisure battery .I have checked the habitat fuses and the big fuse to the rear of the bait atmo fuses ( near rhe red). isolation lever I have the correct readings coming out of the charger ..I am using a victron energy blue smart charger as the orig broke .many thanks in advance .I just seem to be going around in circles at the .moment ..
 

Attachments

  • 17201097599568869558692155048802.jpg
    17201097599568869558692155048802.jpg
    480.4 KB · Views: 104
Thanks for the reply .I will watch that tonight .it does have cables actually going to it at rear of switch .from memory two blue and two brown cables at rear on that switch
 
Yep that video helps alot
I have always shown a battery drain on the meter since I got the motorhome many years ago .
The switch indeed is a dummy switch as no cables on the top side of switch ..so when my engine is running it's charging the battery off the alternator .everything works .lights and fridge plug sockets etc ..when I turn engine off .and plug in book up the lights work for a short amount of time .then stop working .the plug sockets work as the kettle powers up .the electric step does not work .thanks again .
 
If yours is the same panel then the only way to be sure is to pull the panel out to see if anything is connected to that switch.
 
If yours is the same panel then the only way to be sure is to pull the panel out to see if anything is connected to that switch.
Yes panels same .no wires on the top two spades on that switch 👍
 
This is my charger set up .tho it's not on at moment due to engine running .I can't understand why the leisure battery is not charging when the hunters hooked up and this is on ..wondering if the cable goes to rear of fridge area and has a fuse on it further down where I can't see
 
Obviously when the engine is running the lights all work .the leisure battery was new only this week so hoping it's not drained and killed it .I just thought everything was working as should .damn
 
This is the charge unit that's on board working and the multi meter reading on the outgoing cables
 

Attachments

  • 17201189883591137560829186909960.jpg
    17201189883591137560829186909960.jpg
    575.1 KB · Views: 81
  • 17201190665242913647771595102171.jpg
    17201190665242913647771595102171.jpg
    487.4 KB · Views: 77
This is the charge unit that's on board working and the multi meter reading on the outgoing cables
you need to check the voltage on the battery to see it it is changing when the charger is on. That mains charger will have a voltage on it even if it is not connected.
 
Yes, connect your meter to the battery, if the voltage increases when you switch the charger on then the charger is supplying a charge but it's not showing properly on the app. If the voltage doesn't rise then there is a break in the wiring between charger and battery. You can check the + and - individually for continuity between the charger and battery using the ohms range (disconnect a lead off the battery first and turn off the charger) so you can concentrate on the offending cable, depending on the distance between the 2 you may have to extend one of the meter leads with an extra length of cable, check every physical joint and junction especially those covered with heatshrink, also the fuse holders themselves not just the fuses, again the meter set to ohms makes this pretty quick and easy to trace continuity.
 
UPDATE !! I HAVE CUT THE BLUE LIVE .AND BROWN NEG CABKES BACK AND RE INSERTED INTO THE CHARGER .I NOW HAVE LIGHTS .!! so hopefully it charges as should and this is sorted .now onto the rear light .when indicators on the other two bulbs next to indicator also light up 😂.thanks for everyone's support who replied .much appreciated 👍
 
UPDATE !! I HAVE CUT THE BLUE LIVE .AND BROWN NEG CABKES BACK AND RE INSERTED INTO THE CHARGER .I NOW HAVE LIGHTS .!! so hopefully it charges as should and this is sorted .now onto the rear light .when indicators on the other two bulbs next to indicator also light up 😂.thanks for everyone's support who replied .much appreciated 👍
Is blue live and brown neutral a typo? If not you've probably got them hooked up backwards 😩
Brown positive, blue negative is the standard format.

Your rear light issue has the symptoms of a bad earth at the cluster.
 
Is blue live and brown neutral a typo? If not you've probably got them hooked up backwards 😩
Brown positive, blue negative is the standard format.

Your rear light issue has the symptoms of a bad earth at the clus
No on a hymer the blue is the positive and brown is the negative ..it's just how they do it to confuse people 😂..defo as I remember looking into that before .👍
 
I did speak too soon tho .must be a loose connection on a wire somewhere from the battery charge unit to the system.as it stopped working again .
If I run a temporary cable from charger straight to leisure battery it charges the system and all lights work ..just wondering if to do this permanently but not sure if it will work as hymers have relays at back of habitation fuse box to do with switching over to charge from alternator when driving .
 
Yes, connect your meter to the battery, if the voltage increases when you switch the charger on then the charger is supplying a charge but it's not showing properly on the app. If the voltage doesn't rise then there is a break in the wiring between charger and battery. You can check the + and - individually for continuity between the charger and battery using the ohms range (disconnect a lead off the battery first and turn off the charger) so you can concentrate on the offending cable, depending on the distance between the 2 you may have to extend one of the meter leads with an extra length of cable, check every physical joint and junction especially those covered with heatshrink, also the fuse holders themselves not just the fuses, again the meter set to ohms makes this pretty quick and easy to trace continuity.
Thanks ..will give this a go at some point over the weekend for tracing the problem
 

Users who viewed this discussion (Total:0)

Back
Top