Sully the LDV Convoy

GRWXJR

Guest
I got 'Sully' in November. My first campervan and home converted by a previous owner as a Motocross van. Since I got it I've been tinkering. I've not been tempted to change the basic layout too much (as I'd like to be able to carry my mountain bike inside the van, so some separate storage space and bike space is welcome as it is, segregated from the living space, but accessible via an internal door), but have done a few things

So far...

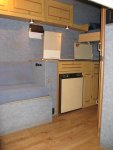
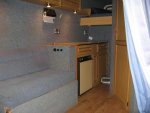
Removed one half of the (pretty small, cramped & pointless) bunk area above the rear storage and put in a new piece of ply, so that one half of the rear storage is now full height. I kept the other half accessed from the living space to store the spare cushion for the fold-out bed, and as somewhere high n dry and out-of-the-way to stash bedding during the day.

Fixed the Split Charger circuit so that the Alternator charges the Leisure battery on the move.

Repaired the feed so the Fan Blower works (only on 4 tho cos the variable resistor card is FUBAR).

Repaired the feed and the electrics on the Eberspacher 'Handiwash' H&C sink in the cloakroom area

Made up a Mains hook-Up lead and tested the 230VAC electrics

Replaced the submersible water pump and fixed the bad connection on the microswitch trigger circuit so the sink tap works
Made sure the grill and twin hob works ok, the 3-way fridge too

Adapted my AC Mains 10A Numax Intelligent battery charger to a cigar socket output. This means that I can plug it into the dashboard cigar point to maintain the starter battery, or plug it into a socket in the overhead cupboard so it then would maintain the Leisure battery while on Hook-up - nice n easy.

And the best bit.....

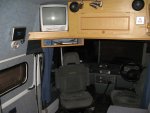
Sourced and fitted 2 swivel captains seats instead of the awful std drivers seat and passenger bench :banana:

The Seats I took a punt on and used (sourced off a well-known Auction website, which came up reasonably locally, so I saved a fortune in shipping and collected myself) are the 'middle row' of 2 seats from a scrapped Mitsubishi L300 Delica 4WD people carrier thing. Drivers adapted to fit the original LDV base to make sure it lines up and adjusts to the pedals correctly, with the passenger one fitted by using Unistrut bolted across the floor L-R on the original seat floor mount points, then using the Mitsubishi seat rails shortened and bolted to to the Unistrut. using Unistrut meant that I could move the seat L & R to position it where it could pivot 360 degrees without clouting anything. Retaining the rails means the passenger seat can also move fwd & backwards for comfort and to be able to recline it more when its rear facing! Pretty please with the result - makes the van space seem much nicer - a bit more campervan-like and less van-like if you know what I mean.

I was also able to get the Mitsubishi Inertia Reel Seat belts with the seats. The seats have on-board belt receivers, so by using the Mitsubishi belts I could do away with the long cable-stalk LDV belt receivers off the floor - less to get in the wat and trip over!

There's now more room between the seats for access to the living space, plus of course you can turn the seats around to make access even easier.

The bad news is that (in doing the job) I found the foam insulation under the rubber cab mat was soaking wet, so I had to strip it out and then I had to rub down, put rust-killer onto some patches of corrosion then paint the floor with a couple of coats of white Hammerite Smooth to look after the floor, wash & dry the floor insulation. It looks like the door seals are not sealing (windscreen seems ok as the acoustic foam in the scuttle is dry) and rain (plenty of that) is running around the doors onto the F wheel arches and soaking into the foam. So, no floor covering in the front until I can be sure I've sorted the seals and made sure no water is getting in so the foam has a chance to stay dry. Not sure how I'm going to tackle that yet. Ho hum.

Got a couple of bits of rust on the body (but seems pretty good compared to many I've seen) to sort, and the chassis seems sound with just some surface rust on the chassis rails, so (if we ever get some dry weather) I'm hoping that a quick clean and some waxoyling under there will keep the tin weevil at bay for years to come.

Good news is that me and the other half actually went out for a spin in Sully yesterday for the first time! Only down the coast and stopped for a brew up, but still!

Sully is still just a cheapo and fugly LDV Convoy, but its starting to grow on me, and looks like he'll do nicely for the odd getaway for us.
 
Cab flloor done!

Applied Flashing Tape to the entire cab floor today to assist with noise reduction (like 1 big sound-deadening pad).

Refitted the foam-based rubberised flooring, cutting it with a Stanley knife to fit around the new passenger seat mounting Unistrut sections, also round the drivers seat (couldn't be bothered to remove the seat again, plus anyway I wanted to be able to take the flooring out with the seat in situ if I need to in future).

Refitted the 2 moulded cab step inserts. Refitted the gear lever extension and the rubber gaiter, and stuffed the gaiter with some loft insulation in a plastic bag as well before fitting it back to the floor.

When the floor was bare painted metal, I got a reading of 80-81dBA @ 55-60mph. With the kit back in as described, the noise reading dropped to 77-78dBA, so half the previous noise level (decibel scale being logarithmic) though of course the std rubberised mat would have done some of that without the flashing tape. At least I know the floor is sound, painted, sealed and ok, and there's no horrors hiding underneath now too.

Next jobs are to get some more sound pads and some acoustic stuff and treat the area under/behind the dash and dash pockets with as much of it as possible, and to fit some universal door seals around the doors to try and improve the interior cab noise further, and make Sully as nice to a place to drive / ride in as possible.

If we ever get any dry decent weather, then I've got an engine / gearbox, FD service to do, also Waxoyl or Shultz the underneath at some point, to try and keep the van bodywork in good order.

I do get the feeling though that there'll always be a list of things to do!
 
Last edited:
More stuff done!

Been out in the cold today and made a bit more progress.

Changed the height of the shelf in the rear storage sectioned-off area in Sully today, so now I can stow my Mountain Bike across in front of the rear doors (upside-down with the F wheel out) where it takes up the least space, and doesn't restrict access to the storage from inside the van.

There's a folding access hatch section in the rear wall of the 'cloakroom' so you can go from 'living space' through to 'storage space' in Sully so you don't have to go outside and round the back to get at stuff - you only need to open the rear doors to get the bike or any bigger stuff in and out. The hatch was put in to allow a moto-x bike to be carried by it running through the hatch and being parked half-in the cloakroom, but its handy for general access I find.

The space given over to storage does of course reduce the living space, so Sully doesn't have as much living room as some the same external dimensions - but I ain't planning on holding a dance in there, and having segregated space to keep mucky Mountain bike Gear, tools, and whatever other assorted crud seems such a good idea compared to having it cluttering up (& smelling up post ride :lol-053:) the living area. Fitting captains seats has done a lot to improve the living space and make it seem more roomy as well as much nicer to be in.

The storage area should also prove to be great to keep lawn chairs, luggage, the BBQ and the charcoal / logs as well - just like having a garage with you :p !

The good news is that the hatch would easily allow me to carry a scooter or small motorbike inside the van if I ever felt the need in the future - just get a lightweight ramp made up and shove it in - theres a section of unistrut on the floor by the back door with strong eyes attached to lash a motorbike down securely. Or I could fit a couple more Mtb's in there if a couple of mates came along (some friends and I did the Mountain Mayhem and Octoberfest weekend Mountain bike events last year for fun - Sully would be great for going somewhere like that - having been parked up in a field, sleeping in a tent with no facilities except loos about a half-mile away for a weekend makes the idea of spending the duration in Sully seem like a weekend at the Hilton!

Luckily whoever converted my van, had the forethought to put a pair of 230VAC power sockets in the storage area, so on hook-up I was able to able to wield my jigsaw with abandon!

Still a fair few things to do, but getting there slowly. I'll try and take a few pics at some point if anyone has any interest. I'm looking forward to actually going and spending a night out in the van to see how we get on. Sully has a Webasto night heater, so we might even have a go pretty soon!
 
Yep, let's see this mean machine of yours, I want a look at the seat fittings, trying to work out what you've done from the descriptions in the (useful) posts on the single passenger seat for transit thread.
 
Ditto...

I can't wait to see it too....


Photos! Photos! Photos!


I love stealing other peoples ideas...:)


We want photo's!!!!
 
Ok... (if I can upload), here's some pics of Sully

Firstly, thanks to Terrywolf for the LDV link - I'll check that out.

Ok..... first let me get my excuses in - the floor won't always look like I keep pigs in there ok? Clambering in and out on snowy/soggy ground means every time I'm in and out doing anything its a 'mare. I've tried to keep on top of the worst, but at the moment its a waste of time, so a wash when the ground is dry it'll have to be.

Also - its dark ok, and David bailey I ain't either (& Sully is no Supermodel thats for sure), so please don't expect great pics!

I tried to take a few pics to get the inside ok and the rear storage, and a couple of the passenger seat 'Unistrut' mounting especially for Whitevanwoman's viewing pleasure (more mess on floor in close-up, mutter, grumble)

Ok (how do you work this thing) ......

Sully Ext NS.JPGSully Ext OS.JPGSully Int 1.JPGSully Int 2.JPGSully Int 3.JPGSully Int 4.JPGSully Int 5.JPGSully Int 6.JPGSully Storage 1.JPGSully Storage 2.jpgUnistrut Seat Mt 1.JPGUnistrut Seat Mt 2.JPGUnistrut Seat Mt 3.JPG
 

Attachments

  • Sully Interior 4.jpg
    Sully Interior 4.jpg
    93.5 KB · Views: 919
  • Sully Interior 5.jpg
    Sully Interior 5.jpg
    99.9 KB · Views: 653
  • Sully Interior 6.jpg
    Sully Interior 6.jpg
    86.9 KB · Views: 703
very nice mate,couple of nice touches,like the way you got the swivel in.well done you
 
I can't take much credit...

Thanks for the nice comments, however whoever built the thing in the first place deserves 95% of the credit, not me.

All I've done is tinker with what was pretty much sorted in the first place (& I reckon I'm better by far at getting something functional than I am at making something smart - a craftsman I ain't.

I guess I'm more of a Bodger (in that I'm ok at fixing stuff with what's available rather as opposed to a 'Botcher' where its just a cruddy lash-up) really - I'm the sort of bloke who mates find useful to have about to help a mate ride his motorbike home after a minor crash - let me loose with a few rudimentary tools, gaffer tape, electrical tape and zip ties and it won't be pretty but it'll get you home kinda thing :p

Its better that I got a van with the interior pretty much sorted, but with a few little issues and fix those than if I tried to do it from scratch really - I'm only having to tinker and fix what is, not actually design all of it from scratch and get a nice finish. I think I'd find it pretty hard to do one from nothing - working out all the electrics and fitting everything - I'd manage eventually and it'd all be ok, but this is far easier :p !

It's shown me enough though for me to have much respect for those who take the plunge and do their own conversion from scratch hands-on though - to do one nicely must take a lot of work and application. All I've really done is move a couple of bits of ply and fixings, fix a few dodgy bits and stick some seats in.

I'm hoping it works out ok though and Sully gives us some good times when he's finally used as intended.
 
very nice van, not ugly at all, and anyway, who cares what the outside is like so long as the inside is warm and dry and comfy. Some really practical ideas there, more food for thought.
 
Brilliant Van.....well done!

The upholstery is very neatly done.
 
Upholstery

The upholstery is very neatly done.

Well, if you meant the bench seat / bed then (again) that's down to the builder, not me I'm afraid.

If you meant the front seats, then the credit for those goes to Mitsubishi :lol-053: !
 
Pretty good! Your descriptions were quite good as well; I'd pretty much got the layout in my head from your previous descriptions, which is a testament to your text as it's quite unusual at the back.
 
Layout

I'd pretty much got the layout in my head from your previous descriptions

People actually read all that burble :eek: !

Hmm - I realised that it was an unusual layout to give so much space over to other than living space, and I guess I'll have to try it out to see how we get on with it. Maybe I'm making a virtue out of the layout because I WANT it to be good, rather than because it IS good. I guess we'll find out. Just because it seems (to me at least) to be practical and useful doesn't mean it is (I liked the potential to carry all my crap, yet be able to just pull over and stop for a 'brew with a view' without having to turf all me gear out of the way first.

I have a mate with an old VeeDub which is smaller and all living space, and he has to load all his bags n paraphernalia into the living space so when he stops he has to horse it all out (not great if its raining!), or onto the f-seats to get at the kettle/stove, and watching him trying to shoehorn his Specialized Mtb in there as well gets all a bit 'ship in a bottle' (amusing to watch though). My thinking was that this 'garage' rear layout should make that sort of thing less hassle.

I have to accept though that if it's really such a good idea, why its not more widely adopted (other than for other Moto-X vans maybe?).

As I have opened up the rear LH corner to full height, then I guess it wouldn't be a massive job to remove the current cloakroom door/wall bit, and convert the rear corner of the storage into the cloakroom to gain that extra space in the living area if we find its not working as it is. I don't really want to consider hacking it about any more than I have already really though (at least until I've seen how we get on with it as it is now and given it a fair shot). I'm hopeful it'll work ok.
 
The Duck

excellent pic's.....hope l can get The Duck another LDV Convoy :D

I've seen some of your posts and it sounds like you're getting stuck in, so keep at it! I had a head start so cheated, as Sully was pretty much as you see him here but for some tinkering.

I've ordered some acoustic stuff which should be here this week - going to see how well I can improve the firewall/scuttle are and quiet the cab down by applying the stuff behind and under as much of the dash area as I can without having to take the whole dash out. There seems to be quite a lot of void space behind the thin plastics of the dash where some stuffing can be done. I'd like to try and reduce the engine noise of the tranny diesel so its more relaxing to drive on the open road.

Once I've done that I'll use works noise meter and hope its been worth buying the stuff and spending the time to muck about with!
 
Noise reduction & power reduction

I got the acoustic material and some sound-deadening pads I ordered this week, so have cut up & applied sd pads to the back of the removable interior dash sections above both footwells and the centre console surround, then stuck some of the material on top of that before reinstating them. All this is part of my ongoing noise reduction programme, and I reckon its working, bit-by-bit (2.5di Tranny engine is not the quietest lump, and stock LDV sound-proofing is a bit... basic).

I've got some more to do, including putting more sd pads on the front wheel arches and on the door skins, and seeing if I can find a way to get more insulation in the engine bay and firewall/scuttle area.

I'm also modernising the lighting to LED's to drop the power draw. I have 3 downlighters which currently have 10w halogen bulbs. I've ordered G4 LED's off the internet that are roughly twice as bright, and draw only 1.2w each - a reduction of a factor of over 9x for just over a tenner.

I've actually changed the 2 old Fluorescent fittings in the Cloakroom and the rear storage yesterday for LED strips and separate on'off switches. The old fittings drew 10A each and gave off a sorry yellowish glow - the LED's draw just 1A each and throw out a much higher and whiter light that illuminates the areas so much better.

So - better lighting and a lot less drain on the battery as well - Result!
 
More LED's

The living space has 3 downlights under the cupboards as the main (off-hook-up) lighting. These had 10w Halogen bulbs fitted, with 2 wire-like prongs.

A search on the internet sorted that these are called 'G4' fitting, so I got onto eBAy and found some LED's which were a whiter light, brighter and only consuled 1.2w each. I coulda got em cheaper by waiting up to 28 days from China/Hong Kong, but basically got 3 in 2 days from a Uk seller for just under a Tenner.

They popped straight into the existing fittings last night and do the job nicely. Should last ages longer, but the main thing I was after was the fact that I now draw just over a tenth of the juice from the leisure battery. Sully only has a 75AH which came with him, and I figured the money spent to reduce consumption is cheaper and better than a bigger or more battery storage.

As I'm never likely to go more than a couple of days without hook-up or driving to recharge via the split charger relay, then I'm hoping this simple mod will mean I can keep the rest untouched.

Theoretically all the lamps would draw 3.6w, so approx. say 0.4 Amps. So sticking to max 50% discharge that's at least 93 hours if the battery is fully charged and in top nick. Allowing for having the radio or the dvd, or the Webasto then consumption would increase, so guessing if I work on an average consumption of say 1.5 Amp worst case then that's about 24-hrs, so should be enough power for the durations I'll need it. We shall see!
 

Users who viewed this discussion (Total:0)

Back
Top