
Scottish Bloke
Guest
Hi, I posted this as a blog last night but can't see how to add to it so re-posting here? I'll add to this thread and update as I get time. The van is well on the way to being converted now, still a fair bit to do but it's come a fair way!
I bought this van about three years ago, as you can see from the original 'colour scheme' she was one of City Link's finest.
I started off looking for a van as I spend quite a few weekends away Sprinting and Hillclimbing my Westfield Kit Car all over the UK and after getting wet and blown away too often camping decided to buy a van, ideal tow vehicle and fit for converting?
After a bit of looking I picked up an ex City Link van with lowish tracable miles at very sensible money, she wasn't pretty and had more hits than the Beetles but I wasn't bothered as I work in the trade. Mechanically very good and very clean underneath.
I plan to get some pics up soon along with some script explaining on which parts I lost which knuckles for anyone who's interested!
Here's what I started with obviously a little stripped, admittedly she doesn't look bad in the early pics but there was a lot of dents and previous poor repairs, all would need re-repaired and the van fully stripped as I planned a full colour change including inside all the checks.
![19662_1359145097994_8197690_n[1].jpg](https://wildcamping.co.uk/data/attachments/6/6811-3fc75651abb1add9fbf80d2d6066cfb9.jpg "19662_1359145097994_8197690_n[1].jpg")
![19662_1359145217997_7627630_n[1].jpg](https://wildcamping.co.uk/data/attachments/6/6835-920b18a4981342c2eb9aa36c529c2f86.jpg "19662_1359145217997_7627630_n[1].jpg")
After a couple of weeks stripping the van in my spare time and with the help of my father in law, (thanks John) the van was fully stripped of all trims, doors, glass etc. There were many repairs to do and the windows to cut out, here's another pic of it moved on a little and glass hole marked.
![19662_1359145257998_2810410_n[2].jpg](https://wildcamping.co.uk/data/attachments/6/6832-b021852f86f4742ac2937c4d3381c19b.jpg "19662_1359145257998_2810410_n[2].jpg")
![19662_1359145297999_3152614_n[1].jpg](https://wildcamping.co.uk/data/attachments/6/6833-2d94879b9410936e16985b911b7cab36.jpg "19662_1359145297999_3152614_n[1].jpg")
Eventually she was ready for primer, lots of primer!
![17562_1377399274337_2900863_n[1].jpg](https://wildcamping.co.uk/data/attachments/6/6834-726e5ecc74ed7173571e602166a35a89.jpg "17562_1377399274337_2900863_n[1].jpg")
Once it'd had enough primer it was baked off, once dry it was hand flatted (my arms still hurt) and then wet on wet primed again before painting. Here's one of it when it came out of the over after painting. It's finished in Ford Sea Grey.
![17562_1377399354339_1319934_n[1].jpg](https://wildcamping.co.uk/data/attachments/6/6836-4588fc30f152633ef393f5f80b7da9d0.jpg "17562_1377399354339_1319934_n[1].jpg")
Now on with painting all the bolt on bits, doors, wings, before refitting these parts plus lights and bumpers...and a million other bits and refitting glass etc, then contemplating fitting out the inside, the conversion!
I bought this van about three years ago, as you can see from the original 'colour scheme' she was one of City Link's finest.
I started off looking for a van as I spend quite a few weekends away Sprinting and Hillclimbing my Westfield Kit Car all over the UK and after getting wet and blown away too often camping decided to buy a van, ideal tow vehicle and fit for converting?
After a bit of looking I picked up an ex City Link van with lowish tracable miles at very sensible money, she wasn't pretty and had more hits than the Beetles but I wasn't bothered as I work in the trade. Mechanically very good and very clean underneath.
I plan to get some pics up soon along with some script explaining on which parts I lost which knuckles for anyone who's interested!
Here's what I started with obviously a little stripped, admittedly she doesn't look bad in the early pics but there was a lot of dents and previous poor repairs, all would need re-repaired and the van fully stripped as I planned a full colour change including inside all the checks.
After a couple of weeks stripping the van in my spare time and with the help of my father in law, (thanks John) the van was fully stripped of all trims, doors, glass etc. There were many repairs to do and the windows to cut out, here's another pic of it moved on a little and glass hole marked.
Eventually she was ready for primer, lots of primer!
Once it'd had enough primer it was baked off, once dry it was hand flatted (my arms still hurt) and then wet on wet primed again before painting. Here's one of it when it came out of the over after painting. It's finished in Ford Sea Grey.
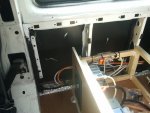
Now on with painting all the bolt on bits, doors, wings, before refitting these parts plus lights and bumpers...and a million other bits and refitting glass etc, then contemplating fitting out the inside, the conversion!
![23562_1387361523387_347515_n[1].jpg](https://wildcamping.co.uk/data/attachments/6/6837-997c7ee954f448204a5a43a85cd157a6.jpg "23562_1387361523387_347515_n[1].jpg")
![27297_1385289431586_4837193_n[1].jpg](https://wildcamping.co.uk/data/attachments/6/6838-817037d44a4b46c0a7f515fb20078f8c.jpg "27297_1385289431586_4837193_n[1].jpg")

![305857_2649496675977_241694584_n[1].jpg](https://wildcamping.co.uk/data/attachments/6/6839-7b1cfbb88d3e08341e410bc0610e8dc2.jpg "305857_2649496675977_241694584_n[1].jpg")
![390424_2649502516123_1930819243_n[1].jpg](https://wildcamping.co.uk/data/attachments/6/6840-abf7bc1bab1e3d9c383c2d6c31bff3e0.jpg "390424_2649502516123_1930819243_n[1].jpg")
![298891_2649521436596_282419984_n[1].jpg](https://wildcamping.co.uk/data/attachments/6/6841-02687292515c1e4c26e89bcdfb354a7a.jpg "298891_2649521436596_282419984_n[1].jpg")
![313151_2649518156514_409836119_n[1].jpg](https://wildcamping.co.uk/data/attachments/6/6842-7c1fb019ee790782911b854ad66bee52.jpg "313151_2649518156514_409836119_n[1].jpg")
![378832_2649511956359_290654697_n[1].jpg](https://wildcamping.co.uk/data/attachments/6/6843-5715c37b1fc17a3883285971a18a23f1.jpg "378832_2649511956359_290654697_n[1].jpg")
![382101_2649593318393_1515982683_n[1].jpg](https://wildcamping.co.uk/data/attachments/6/6859-05d90712d8dc7eb357cf5ec99752387b.jpg "382101_2649593318393_1515982683_n[1].jpg")
![393480_2649582358119_1934090159_n[1].jpg](https://wildcamping.co.uk/data/attachments/6/6860-7856699559ad115614fa27a040ca60a1.jpg "393480_2649582358119_1934090159_n[1].jpg")
![386955_2649596358469_1006958089_n[1].jpg](https://wildcamping.co.uk/data/attachments/6/6861-387d6821d92d9b34ccc2c2c1002e048b.jpg "386955_2649596358469_1006958089_n[1].jpg")
![317338_2649598958534_2100219994_n[1].jpg](https://wildcamping.co.uk/data/attachments/6/6862-9f9d96e9a650dea856d3b589e61ec07c.jpg "317338_2649598958534_2100219994_n[1].jpg")
![297667_2649616478972_1431416872_n[1].jpg](https://wildcamping.co.uk/data/attachments/6/6863-5ec28156ffce5ea3b37a933e181f35f3.jpg "297667_2649616478972_1431416872_n[1].jpg")
![317716_2649529996810_441503455_n[1].jpg](https://wildcamping.co.uk/data/attachments/6/6869-0fe6e44737fcf53d2dd11435626238ec.jpg "317716_2649529996810_441503455_n[1].jpg")


![307786_2649709521298_754883281_n[1].jpg](https://wildcamping.co.uk/data/attachments/6/6887-b35c2d53e9ae79d260ae39c514256793.jpg "307786_2649709521298_754883281_n[1].jpg")
![380939_2676902041094_854139395_n[1].jpg](https://wildcamping.co.uk/data/attachments/6/6888-f500d16656809518816c35b9a7bdc1f4.jpg "380939_2676902041094_854139395_n[1].jpg")

![312969_2649694760929_164062243_n[1].jpg](https://wildcamping.co.uk/data/attachments/6/6889-726ae459f55eb57fc1167f28a43236c6.jpg "312969_2649694760929_164062243_n[1].jpg")
