poindexter
Free Member
- Posts
- 4
- Likes
- 1
Hey Forum, I am at a critical stage of my campervan conversion project and looking for some advice here please.
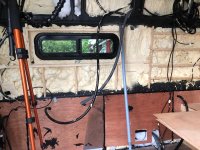
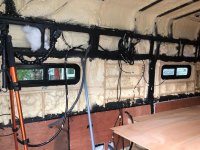
I have insulated with spray foam and now would like to proceed with cladding the walls with tongue and groove wooden cladding. I have installed the wooden framework to attach the cladding to but am a little concerned about moisture.
It would be very difficult to create a moisture barrier with the tongue and groove. It is definitely what I want however.
Just looking for general advice really on what I should do in preparation for fitting the cladding? I did think that I could put in a 3mm ply underlay and seal it around the edges but that would be a fair bit of extra work, cost and weight on a Transit Jumbo.
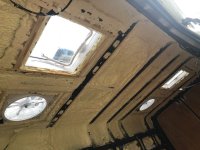
The van is well ventilated with two floor vents, a spinning vent on top, two skylights and two roof vents.
Should my ventilation be good enough that I don't need to worry so much about airborne moisture or should I do some extra prep work? If so are there any good suggestions that are faster, cheaper and lighter than what I had in mind?
Appreciate your responses...
I have insulated with spray foam and now would like to proceed with cladding the walls with tongue and groove wooden cladding. I have installed the wooden framework to attach the cladding to but am a little concerned about moisture.
It would be very difficult to create a moisture barrier with the tongue and groove. It is definitely what I want however.
Just looking for general advice really on what I should do in preparation for fitting the cladding? I did think that I could put in a 3mm ply underlay and seal it around the edges but that would be a fair bit of extra work, cost and weight on a Transit Jumbo.
The van is well ventilated with two floor vents, a spinning vent on top, two skylights and two roof vents.
Should my ventilation be good enough that I don't need to worry so much about airborne moisture or should I do some extra prep work? If so are there any good suggestions that are faster, cheaper and lighter than what I had in mind?
Appreciate your responses...