Idiots guide to changing a solar controller

Steve and Julie

Full Member
Posts
369
Likes
319
I've bought a victron mppt controller to replace the pwm already fitted to our van.in easy terms how do I do this or is it best left to a auto electrician. All help greatly appreciated
 
Post a picture of your existing controller so we can see the cables, connections, and how the connections are labelled.
 
Hope this helps
 

Attachments

  • 1723227116844145278758064059221.jpg
    1723227116844145278758064059221.jpg
    275.2 KB · Views: 50
Get some insulating tape.
First remove the two cables to the left which are for the solar panels.
As you remove each one insulate each cable end. with some tape.
Then remove the two cables to the right for the battery.
Same gain insulate both cable ends as you remove them.
Make sure you know which cable is which before removing old controller.

Affix victron controller to surface.
You must first connect the battery connections before the solar as marked on victron controller.
Then connect solar as marked on victron controller.

If you have fitted a victron controller with Bluetooth download the victron app.
When you do this your controller will be shown on your device.
You will probably have to do a software update.
Once you have done this you are ready to sort out your settings.
The default code for victron is 000000.
 
Make sure you change it to something memorable.

You don't want some mindless tw*t to connect to your controller and alter the settings...
Obviously, hence why I stated sort out your settings. :)
 
Last edited:
Put wires in screw to wall, download app change setting to battery type.
After a time customization can begins.
 
Hope this helps
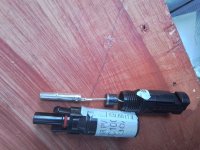
My twopenny worth, I think the connections themselves are all the same on any I've fitted,
the panel on the left, the battery in the middle and usually the load on the right, I've never seen the load connected to anything yet.

The terminals usually go + - + - + - Red being positive, Black negative.

As for the setting I can't help there.
 
Thanks for all your replies I'm off work Monday so will give it a go .
So I don't have to disconnect the leisure battery then?
As soon as you remove the wires from the controller it will be disconnected.

I forgot to add, remove the panel wires first and fit them to the new one last, or conversely connect the battery to the controller first, this allows the controller to read it, and then connect the panel to the controller.

This is generally how it's done, some may do it differently, some also cover the panel to limit any current in the panel wires, and of course never touch a Red wire to a Black wire, MAKUM SPARKS.
 
Thanks for all your replies I'm off work Monday so will give it a go .
So I don't have to disconnect the leisure battery then?
Ideally yes, that's why I asked if you had a switch or a fuse you could pull on the red battery feed cable. If not just carefully remove one cable at a time and tape the end so it can't short to anything else. As you've already been advised disconnect the panels first and re connect them last.
 
I'd not worry too much about the fuse, it would help, but just check if there is one from the positive side of the battery going to the controller, if so you MUST replace it before connecting the panel.
 
I précis. Battery is last off and first on.

As others have mentioned, when you disconnect each pair of wires from the panels or the battery, stick a bit of tape on it or put it in a plastic rawlplug or something to prevent contact with its mate or any vehicle Earth.

Cheers

H
 
Sorry, but this is turning into something it ain’t, ……complicated.
It’s four wires out and four wires back in.
It’s really simple.
You don’t need to look for fuses, mess about with your control panel,
Just do as I said in post 5 job done, in about 15 minutes.


Get some insulating tape.
First remove the two cables to the left which are for the solar panels.
As you remove each one insulate each cable end. with some tape.
Then remove the two cables to the right for the battery.
Same gain insulate both cable ends as you remove them.
Make sure you know which cable is which before removing old controller.

Affix victron controller to surface.
You must first connect the battery connections before the solar as marked on victroncontroller.
Then connect solar as marked on victron controller.

If you have fitted a victron controller with Bluetooth download the victron app.
When you do this your controller will be shown on your device.
You will probably have to do a software update, do it.
Once you have done this you are ready to sort out your settings.
The default code for victron is 000000.
And change the default code to a number you won’t forget, to stop anyone getting control of your controller.
 
I brought this and still not fitted it.
20240810_171513.jpg


it's 30amp fuse
 

Attachments

  • 20240810_171434.jpg
    20240810_171434.jpg
    571 KB · Views: 15
Just started to attempt the swop over and now realised the victron unit is not going to fit where the old controller is. The wires all disappear behind the Sargent control box. Is it safe to remove the metal front from the Sargent looks to be held on with 4 scewa and see if I can locate the wires. Or is it best left to a professional?
 
Back
Top