
wildebus
Full Member
- Posts
- 8,243
- Likes
- 13,101
After a VW T4 SWB and a VW T5 LWB, I decided I needed to go bigger as fed up not being able to standard up, so I bought this little fella ....
A VW LT46 158 LWB
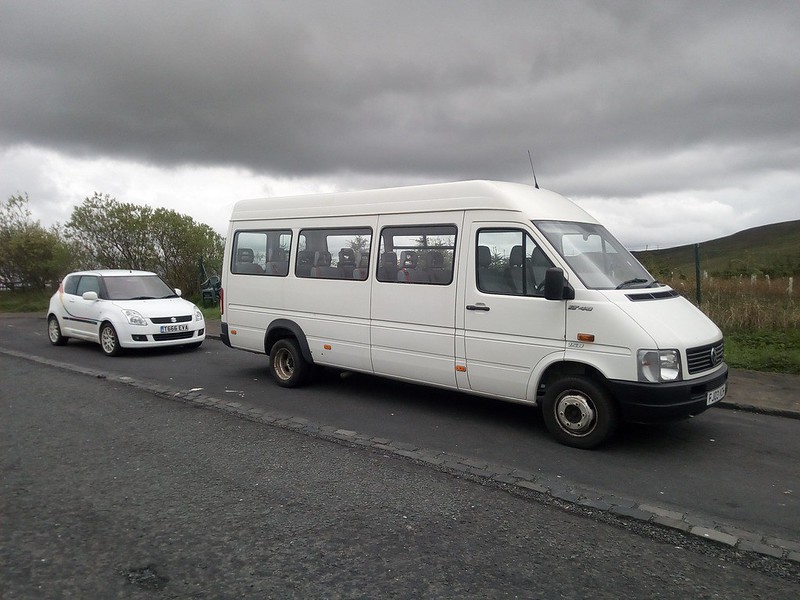 His & Hers by David, on Flickr
This is on the way home after picking it up
It is an ex-County Council School 16 Seater Minibus. 2003 Registered but with a pretty low 125k kms on the clock and the sought-after 2.8L 4-pot engine.
My main focus has been to work out the Habitation Electrics and the general Exterior before the weather turns against me.
At least that way I will be able to carry on working inside over the winter in relative comfort :banana:
Step One - Fit a Fan
Both my T4 and T5 had limited ventilation - no roof vents, small sliding sliding door windows on the T5, but had to close in the rain, so not ideal, and in the summer used to get very hot. So for the LT, a fan was a mandatory requirement.
After looking at the options, I chose the MaxxAir 7000k Electric Fan. Excellent product, albeit very pricey, and has settable temperature target control, so you can set the temp you want, and hit the "auto" button on the remote control, and it will set the fan speed appropriately to get to that target (obviously if it is lower then outside, it will never achieve that but it's not an AC unit) and when there, the fan stops. If the temp rises, the fan starts up again. Also, the motorised vent lid can be left open when driving, and also in rain from any direction.
It really is the Cats Whiskers, and worth every expensive penny.
This is just after I installed it with the vent up ...
 Finished outside by David, on Flickr
Inside it is pretty low profile as well and sits within the ceiling panels so is not obtrusive at all.
Step Two - Electrics
This conversion will be gas-free. I decided I don't want gas-powered devices plumbed inside the vehicle. I know most people have no issues with gas, but I am a lot more comfortable sticking to the 'leccy
And as I still want to be able to cook food, etc, I will need significant 'leccy, so time for BIG 'LECCY
PV Array
Firstly I fitted a tracking system to the roof so I could easily maintain everything fitted to the roof. Once the tracking was mounted, I fitted the first Solar Panel
 Single Panel by David, on Flickr
Looking good, so carried on some more ....
 PV Panels by David, on Flickr
This is a 400W array, comprising 4 100W panels which I set up in a combination Series/Parallel configuration - This allows the MPPT controller to optimize the harvesting and also provides resiliance againstg shading.
Battery Bank
To compliment the 400W PV Array, I installed a 440Ah Battery Bank, comprising 4 110Ah AGM heavy duty batteries. These live in a ply battery box I made, and sit over the rear axle.
 Batteries and Box by David, on Flickr
The way the interior will be laid out, these will be in the garage area under the rear fixed bed, and I fitted the various electical systems in front of the battery box
 Electrical Device Source by David, on Flickr
230V Consumer Unit and 12V Fusebox, plus battery shutoff switch
And over the wheel arch
 Electrics by David, on Flickr
Battery Charger, MPPT Solar Controller, 1000W PSW Inverter and 300W PSW Inverter.
I know a lot of people on this forum are very prejudiced against inverters, and that is fine. To me, you get the right products to do the job you want.
Rather then paying around £800 for a 12V Compressor Fridge, I have got a 230V Compressor Fridge, rated A++ at 80kWh/Annum - that relates to around 220Wh/Day, which is under 1A/Hr current draw. The Inverter being used for the fridge is the Victron 12/375 which has a constant on overhead of 3.5W (lets call that 0.3Ah/Hr worth of 'wasted power') - and that 3.5W is MY figure monitoring my power meter - Victron actually quote around 5W I think.
I'm more than happy to waste 3.5W on an inverter (which will also be used for Laptops, Electric Blanket and the infamous Electric Toothbrush charger) in order to use a more efficient 230V Fridge costing less then 25% of the equivalent Weaco 12V models.
The 1000W inverter is just a cheap model and that will be used only for the Kitchen Appliances - Induction Hob (500W), Slow Cooker (180W), Low-Fat Grill (750W). Obviously I need to bear in mind not to use the grill the same time as the Hob, but that is not a problem :juggle:
The 1000W Inverter feeds to a 230V Contactor which is wired so if I am hookup, the kitchen sockets are automatically switched to incoming mains supply, in which case I can fill my boots with all the gadgets (upto 2300W worth anyway :baby: )
BTW, The holes in the battery box lid are for ventilation, as opposed to venting (these being AGM batteries)
That is pretty well it for the inside really at this stage, except maybe the cab?
I removed the cab seats (1+2 setup) and installed a pair of Ford Galaxy seats instead
 Cab Seating Sorted by David, on Flickr
Lovely seats with inner armrests and built-in swivels. I will be maximising the interior space use with these swivel seats and a little front lounge/dinette area, keeping one of the original minibus seats at the front to have a face-to face seat and also as an extra travel seat.
I did make a slight tweak to the exterior look as well a couple of weeks ago ....
I am sure there will be a few of you who remember the TV Program "Daktari", about an Animal Hospital in Tanzania (Daktari is the swahili for Doctor).
 DAKTARI DVDs by David, on Flickr
I loved that program and have always wanted a Daktari style vehicle since seeing it in the 60's
Well, I don't have to want any more!
 Side by David, on Flickr
Tinted Windows with blacked out surrounds, a black stonechip treatment at the bottom and around the front arch, and professional designed, cut and fitted stripes all around :heart: :heart:
As well as the front light bar, I also commissioned a Rear Spare Wheel Carrier and fitted a Rhino Racks Ladder at the back
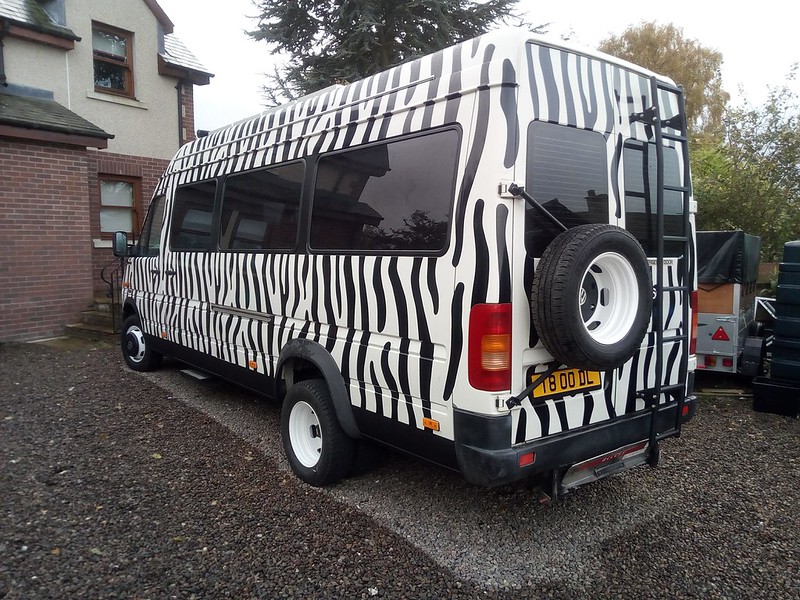 Rear by David, on Flickr
I'll update this thread once I have done some interior fitout, but thought somne may be interested in this (and maybe saw it at a meet and wondered "WTF" - a bit of an explanation :wacko: )
A VW LT46 158 LWB
His & Hers by David, on FlickrThis is on the way home after picking it up
It is an ex-County Council School 16 Seater Minibus. 2003 Registered but with a pretty low 125k kms on the clock and the sought-after 2.8L 4-pot engine.
My main focus has been to work out the Habitation Electrics and the general Exterior before the weather turns against me.
At least that way I will be able to carry on working inside over the winter in relative comfort :banana:
Step One - Fit a Fan
Both my T4 and T5 had limited ventilation - no roof vents, small sliding sliding door windows on the T5, but had to close in the rain, so not ideal, and in the summer used to get very hot. So for the LT, a fan was a mandatory requirement.
After looking at the options, I chose the MaxxAir 7000k Electric Fan. Excellent product, albeit very pricey, and has settable temperature target control, so you can set the temp you want, and hit the "auto" button on the remote control, and it will set the fan speed appropriately to get to that target (obviously if it is lower then outside, it will never achieve that but it's not an AC unit) and when there, the fan stops. If the temp rises, the fan starts up again. Also, the motorised vent lid can be left open when driving, and also in rain from any direction.
It really is the Cats Whiskers, and worth every expensive penny.
This is just after I installed it with the vent up ...
Finished outside by David, on FlickrInside it is pretty low profile as well and sits within the ceiling panels so is not obtrusive at all.
Step Two - Electrics
This conversion will be gas-free. I decided I don't want gas-powered devices plumbed inside the vehicle. I know most people have no issues with gas, but I am a lot more comfortable sticking to the 'leccy
And as I still want to be able to cook food, etc, I will need significant 'leccy, so time for BIG 'LECCY
PV Array
Firstly I fitted a tracking system to the roof so I could easily maintain everything fitted to the roof. Once the tracking was mounted, I fitted the first Solar Panel
Single Panel by David, on FlickrLooking good, so carried on some more ....
PV Panels by David, on FlickrThis is a 400W array, comprising 4 100W panels which I set up in a combination Series/Parallel configuration - This allows the MPPT controller to optimize the harvesting and also provides resiliance againstg shading.
Battery Bank
To compliment the 400W PV Array, I installed a 440Ah Battery Bank, comprising 4 110Ah AGM heavy duty batteries. These live in a ply battery box I made, and sit over the rear axle.
Batteries and Box by David, on FlickrThe way the interior will be laid out, these will be in the garage area under the rear fixed bed, and I fitted the various electical systems in front of the battery box
Electrical Device Source by David, on Flickr230V Consumer Unit and 12V Fusebox, plus battery shutoff switch
And over the wheel arch
Electrics by David, on FlickrBattery Charger, MPPT Solar Controller, 1000W PSW Inverter and 300W PSW Inverter.
I know a lot of people on this forum are very prejudiced against inverters, and that is fine. To me, you get the right products to do the job you want.
Rather then paying around £800 for a 12V Compressor Fridge, I have got a 230V Compressor Fridge, rated A++ at 80kWh/Annum - that relates to around 220Wh/Day, which is under 1A/Hr current draw. The Inverter being used for the fridge is the Victron 12/375 which has a constant on overhead of 3.5W (lets call that 0.3Ah/Hr worth of 'wasted power') - and that 3.5W is MY figure monitoring my power meter - Victron actually quote around 5W I think.
I'm more than happy to waste 3.5W on an inverter (which will also be used for Laptops, Electric Blanket and the infamous Electric Toothbrush charger) in order to use a more efficient 230V Fridge costing less then 25% of the equivalent Weaco 12V models.
The 1000W inverter is just a cheap model and that will be used only for the Kitchen Appliances - Induction Hob (500W), Slow Cooker (180W), Low-Fat Grill (750W). Obviously I need to bear in mind not to use the grill the same time as the Hob, but that is not a problem :juggle:
The 1000W Inverter feeds to a 230V Contactor which is wired so if I am hookup, the kitchen sockets are automatically switched to incoming mains supply, in which case I can fill my boots with all the gadgets (upto 2300W worth anyway :baby: )
BTW, The holes in the battery box lid are for ventilation, as opposed to venting (these being AGM batteries)
That is pretty well it for the inside really at this stage, except maybe the cab?
I removed the cab seats (1+2 setup) and installed a pair of Ford Galaxy seats instead
Cab Seating Sorted by David, on FlickrLovely seats with inner armrests and built-in swivels. I will be maximising the interior space use with these swivel seats and a little front lounge/dinette area, keeping one of the original minibus seats at the front to have a face-to face seat and also as an extra travel seat.
I did make a slight tweak to the exterior look as well a couple of weeks ago ....
I am sure there will be a few of you who remember the TV Program "Daktari", about an Animal Hospital in Tanzania (Daktari is the swahili for Doctor).
DAKTARI DVDs by David, on FlickrI loved that program and have always wanted a Daktari style vehicle since seeing it in the 60's
Well, I don't have to want any more!
Side by David, on FlickrTinted Windows with blacked out surrounds, a black stonechip treatment at the bottom and around the front arch, and professional designed, cut and fitted stripes all around :heart: :heart:
As well as the front light bar, I also commissioned a Rear Spare Wheel Carrier and fitted a Rhino Racks Ladder at the back
Rear by David, on FlickrI'll update this thread once I have done some interior fitout, but thought somne may be interested in this (and maybe saw it at a meet and wondered "WTF" - a bit of an explanation :wacko: )