ambulance -a beginning

hi dave,i only had a water heater once and never bothered again. in my own vans I use a 10 litre water container,the white ones you can see the water level,put just the right amount of cold in then a kettle of hot,then have a drop in pump attached to the shower pipe and drop it in.have the pump switch above the shower head,turn on the water,get wet,turn off,soap up,then on again for a rinse,and you can see the water level all the time.
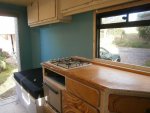
the burner is one my son made,i've done a few gas bottle ones,great for getting hot quick and burning anything,but not for all night,that's what beds are for !.
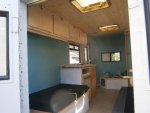
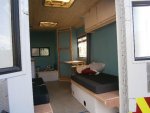
the beds are cheapo 6mm ply sides and 9mm top,strengthened by 15mm batten glued and pinned in every corner.the toilet wall is also 9mm
btw,the simplest shower is ply,vinyl floor,all corners sikaflexed then gloss paint the walls .I had one like this in a bus for about 5 years used regularly,quick wipe down after use,no need to get complicated !
my daughter doesn't like sinks,they collect dirty things and look crap,you never get them in traveller's vans,so i'm putting a swivel tap in the worktop next to the side door,one with a pullout shower head,so she can fill a bowl for washing or washing up,or stand outside to wash her hair or rinse off salt water .
yes i'm having today off !
 
I have a large water heater built into my CI coachbuilt & haven't used it in 2 years, nor do I expect to, it encourages the use of too much water when wilding. If she wants a shower we can use a camp site for one night.

FWIW, my first coachbuilt (a '72 Transit Landliner) had a wall mounted Ascot Geyser style gas instant water heater & that was lovely for hot water for washing, shower & dishes. with a hot & cold pressurised system, turning any hot tap on pulled water thro the Ascot & it quickly came out hot. All cold taps were fed directly from the pump. It's a simple set up. relatively cheap, uses limited storage (but needs a bit of wall & an external flue) and pretty reliable.

But mostly for hot water we just put the kettle on the hob for 5 mins (& do a cup of tea at the same time!)
 
A day off, mr brown?! How very dare you! :)

I don't wonder. I could see the clouds of smoke from way up here ;)

I thought the southern injuns were on the warpath, or Jensen Button was burning a bit of rubber :scared: :lol-053:

Hats off to you, Mr Gonzalez - where the hell d'you get the energy from?!
 
it may seem fast marie,but I really should be able to do a simple fit like this in my sleep,and having the right tools helps loads. after all look at it-all the insulation is done,the eberspacher is in,all the windows and roof lights are in,there's a 110ah leisure battery fitted with wires through to the living area,that's all major time consuming stuff-I just have to go in and do the nice bits !
 
This info will come in really useful once we get the build started so thanks a lot Nigel. Thanks to Smaug as well for his contribution, all good advice so a few things for us to consider.
 
some more pics

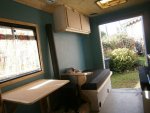
tung 008.JPGtung 007.JPGtung 006.JPGtung 005.JPG the upholstery is that red material,not my dept-mrs brown does that and the curtains.i might get the floor down today,engineered bamboo. I cut the roof hole for the flue, the whole body is 50mm thick ally and insulation composite board ,amazing insulation ! the folding table is just for drawing,i'll stick a fiamma leg between the seats
 
View attachment 17645View attachment 17644View attachment 17643View attachment 17642 the upholstery is that red material,not my dept-mrs brown does that and the curtains.i might get the floor down today,engineered bamboo. I cut the roof hole for the flue, the whole body is 50mm thick ally and insulation composite board ,amazing insulation ! the folding table is just for drawing,i'll stick a fiamma leg between the seats

Excellent job ,love the door fronts , where can i get ply with that swurley look , looks fantastic , Shawbags (Chris ).
 
Excellent job ,love the door fronts , where can i get ply with that swurley look , looks fantastic , Shawbags (Chris ).
sorry mate,all done by my daughter with this kit-http://www.screwfix.com/p/rubber-drum-sanding-kit-25pcs/19906 and a lot more imagination than I've got !
 
sorry mate,all done by my daughter with this kit-http://www.screwfix.com/p/rubber-drum-sanding-kit-25pcs/19906 and a lot more imagination than I've got !

So she has just sanded away some of the surface plys? Doesn't that make the wood surface uneven? Or does it just look "rustic".
 
Hi there,whats the name and colour of the wood stain / varnish you are using ,great finish , love the colour , cheers Shawbags (chris).
 

Users who viewed this discussion (Total:0)

Back
Top